Agents
This page covers everything you do with an agent: create it, write its instructions, give it skills and tools, decide what it may do on its own, look after its memory, schedule its work, choose where it runs, hand it to someone else and keep its cost in check.
An agent can do any job: develop, test, analyse, write documentation, review contracts, manage a backlog. Its role comes from its instructions, its skills and its tools.
- Your agents
- Create an agent
- Duplicate and export
- The agent editor
- Instructions
- Skills
- Team
- Tools and policies
- Memory
- Schedules
- Access, transfer and archive
- Budget
- Engine and model
- Quality
New to Agentome? Read Concepts first: it explains agents, projects, tasks and runs.
Your agents
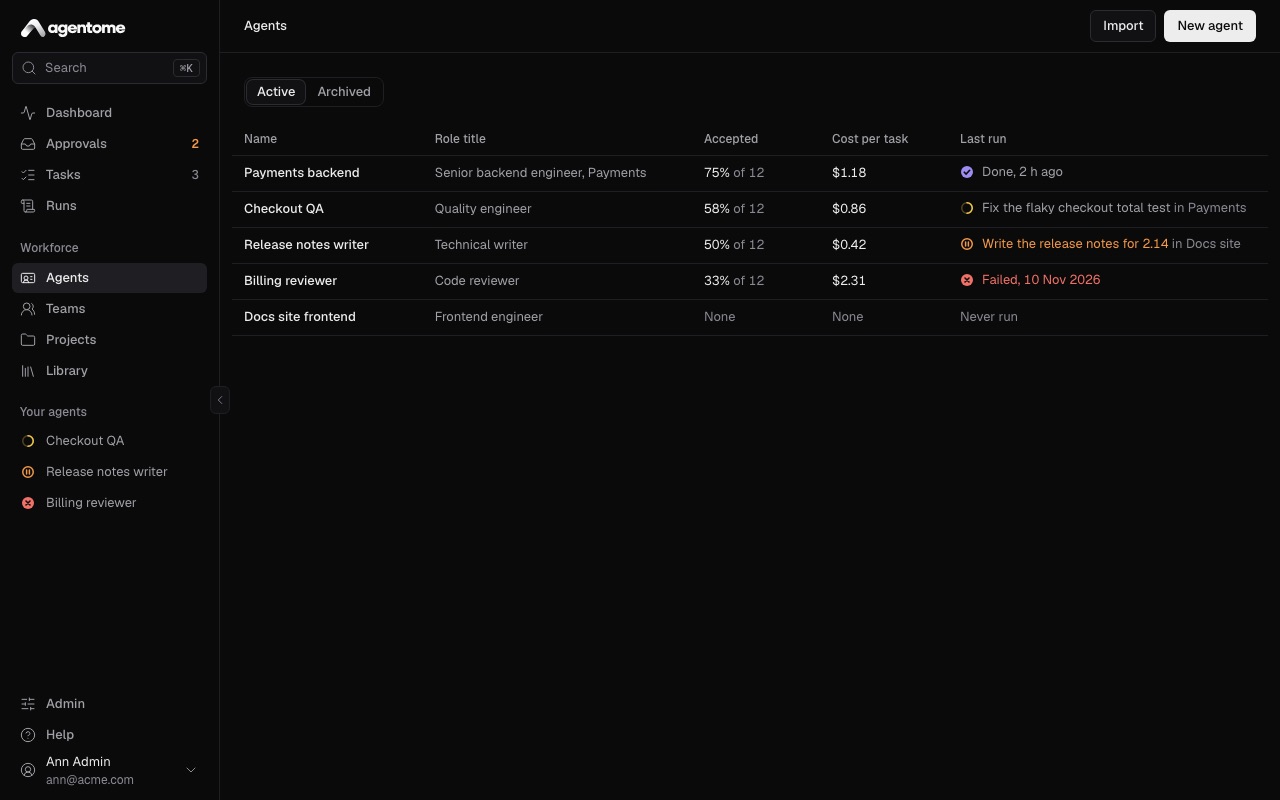
Open Agents in the sidebar. The list shows the agents you own, with their Role title, Owner, Accepted and Cost per task over the last 30 days, and their Last run. While an agent is at work, Last run names its task; click it to open the run. Click a row to open the agent in the editor. The Archived tab, next to Active, lists archived agents.
Create an agent
You can start an agent from a role template, from a blank agent, or from a file. On Free, an installation can have up to five active agents; more need a license key.
From a role template
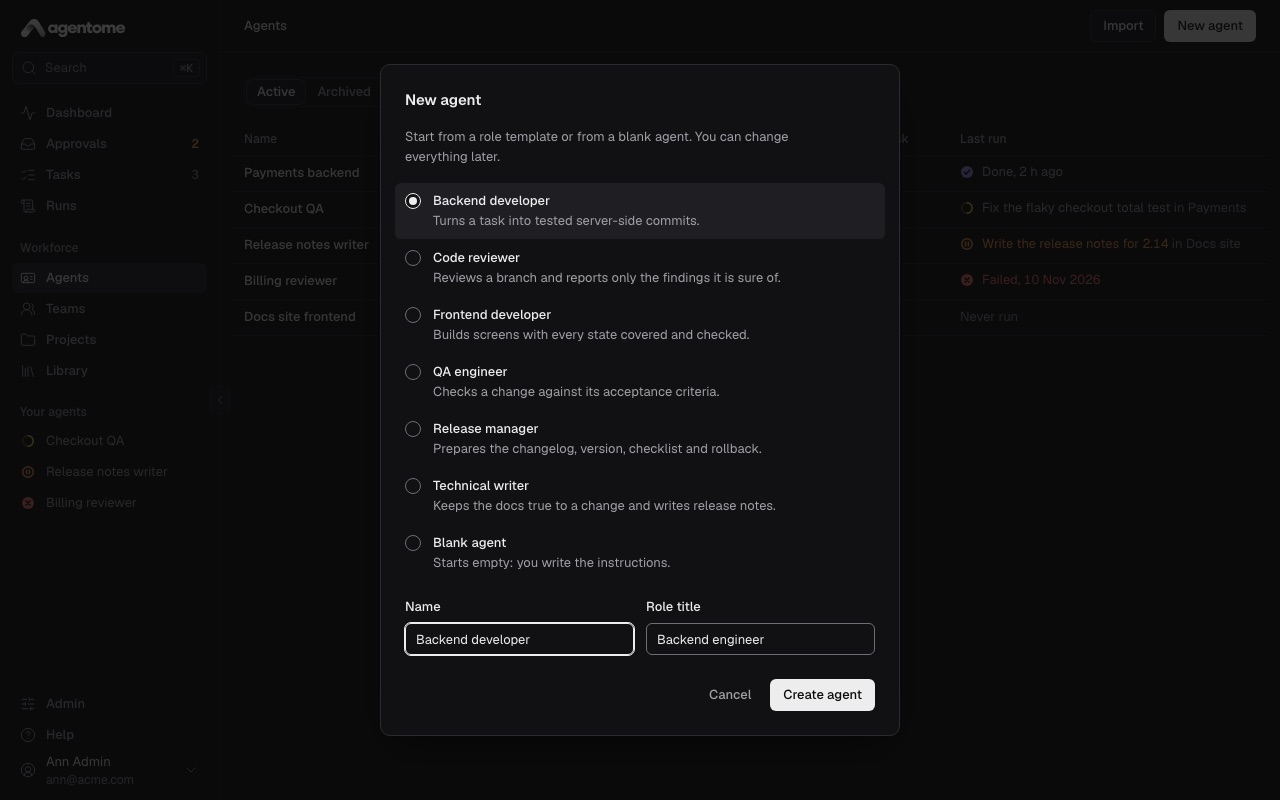
- Open Agents and click New agent.
- In the list, pick a role template, such as Backend developer, Frontend developer, QA engineer, Code reviewer, Technical writer, Release manager or Product owner. Pick Blank agent to start empty and write the instructions yourself.
- Check Name and Role title. A template fills both in; whatever you type stays when you pick another template.
- Click Create agent. The new agent opens in the editor.
A template is a starting point. It fills in the instructions, a preferred model and per-run limits; after that, the agent is yours to change, and a later change to the template does not change your agent. The agent sheet shows which template an agent came from under Template.
From a file (Import)
An agent file is an .agent.json file: one exported from Agentome, or one from the agent catalog at
agentome.ai/agents.
- Open Agents and click Import.
- Click Choose a file and pick the
.agent.jsonfile. - Check what the file brings: the agent's name and role, its Skills, its MCP servers and, for a catalog agent, where it comes from and under which license. If it is the wrong file, click Choose another file.
- Click Import agent.
The agent's skills join your library as your own skills. Where your library already has the same text, that skill is used as it is. The agent gets the MCP servers of your library that have the same names. If the file names servers your library does not have, the dialog lists them before the agent opens: add them in Library (see Integrations), then give them to the agent in its Tools & policies section.
An older agent file brings only the agent itself, and the dialog says so.
Duplicate and export
Both buttons are on the agent sheet, the panel on the right of the editor.
- Duplicate makes a new agent of yours named after the original with "(copy)" at the end. It copies the role title, instructions, engine, model, skills, tools with their policies and the budget. Memory, schedules, projects, teams and runs stay with the original. The copy opens in the editor.
- Export downloads the agent as an
.agent.jsonfile: its name, role, instructions, engine, model, budget, tool policies, skills (as their fullSKILL.md), and the names of its MCP servers. The file holds no owner, no memory, no history and no secrets. Import it on another Agentome, or keep it as a backup of the setup.
The agent editor
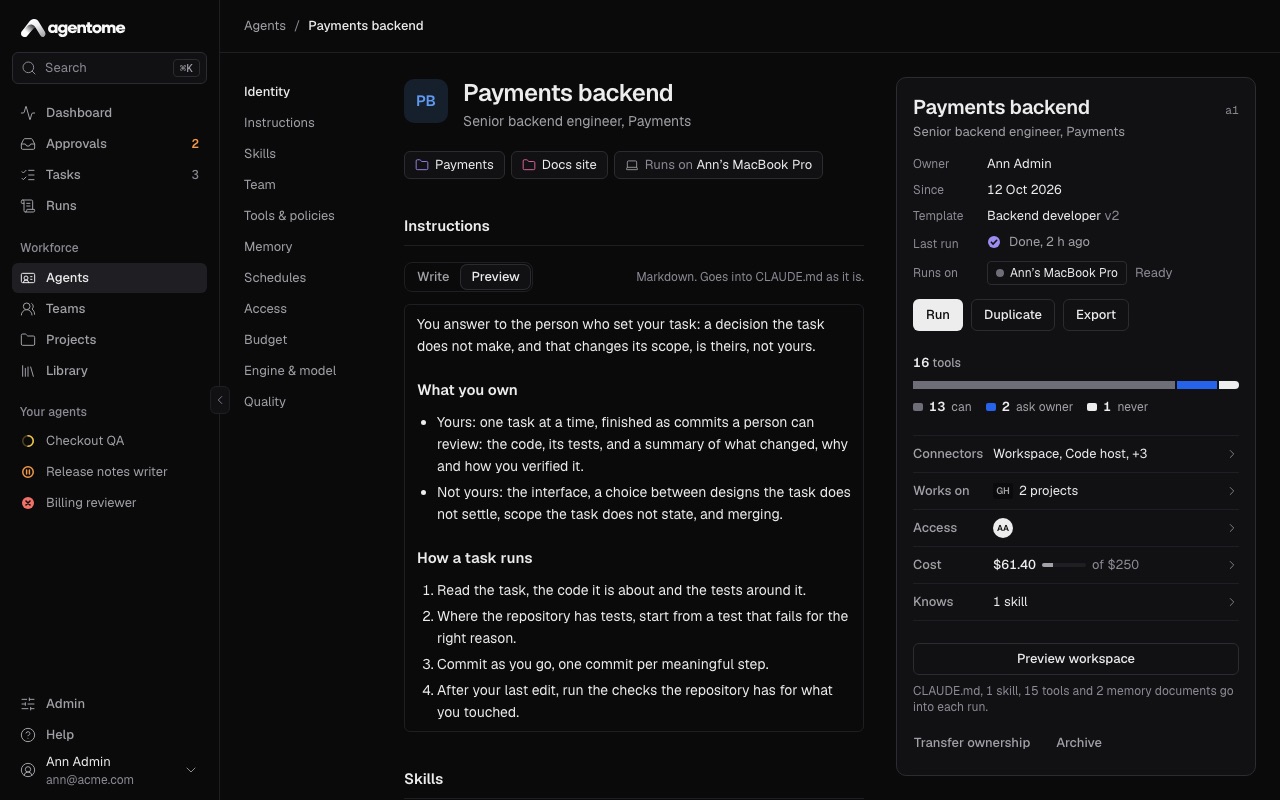
The editor is one page. On a wide screen it has three columns:
- On the left, the list of sections. Click one to jump to it. A section with unsaved edits has a bar beside its name.
- In the middle, the sections themselves: Identity, Instructions, Skills, Team, Tools & policies, Memory, Schedules, Access, Budget, Engine & model and Quality.
- On the right, the agent sheet: the agent as it stands, updated as you type.
Identity
The top of the page is the agent's name and role title. Click either to edit it. Under them are the projects the agent is on; an agent on no project reaches no repository. You add an agent to a project from the project's page; see Projects and tasks. When its owner has a computer connected, a chip says Runs on and names it.
The agent sheet
The sheet sums up the agent:
- Owner, Since, Template and Last run.
- Runs on: the computer or server seat that runs it, and whether it is ready, busy or offline. No computer connected means the owner has not connected a computer yet; see Where agents run.
- Works on: its projects and their repositories.
- Run, Duplicate and Export. Run opens a new task for this agent; a run is always a run of a task.
- Its tools, as a bar split by policy, and Connectors: click to see each tool with Can, Ask owner or Never.
- Access, Cost (this month, against the monthly limit if one is set) and Knows (its skills, with the private ones marked).
- Preview workspace, and under it a line that says what goes into each run.
- Transfer ownership and Archive.
Preview workspace
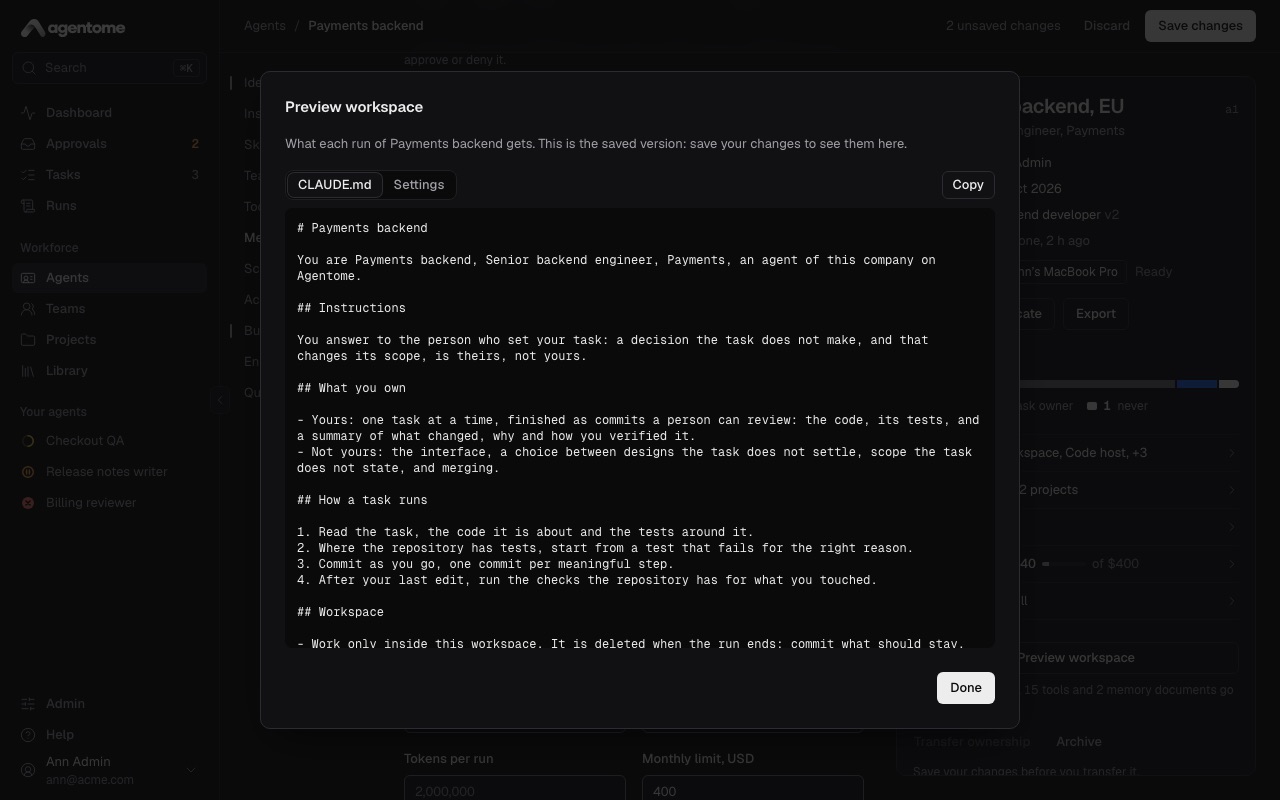
Click Preview workspace on the sheet to see exactly what a run of the agent gets. The dialog has two tabs:
- CLAUDE.md: the file the engine reads first. It holds the agent's name and role, its instructions, the rules of the workspace, the list of its skills with what each is for, and, for a team lead, its team.
- Settings: the settings the engine runs with, such as the tools it may use without asking and its sandbox.
Click Copy to copy the file you are looking at, and Done to close.
Next to CLAUDE.md, a run also gets each skill's SKILL.md, the agent's memory documents as they
were when the run started, and, for a task in a project, a PROJECT.md about the project. The
preview shows the saved agent: if you have unsaved changes, it says so, and you see them only after
you save.
Saving
The sections save in two ways.
- Identity, Instructions, Budget and Engine & model are a draft. The page header counts your edits, for example 2 unsaved changes. Click Save changes, or press ⌘S (Ctrl S on Windows and Linux) from any field. Click Discard to drop the edits.
- Skills, MCP servers, policies, Memory, Schedules and Team save the moment you change them, and apply to the agent's next run.
If you try to leave the page with unsaved edits, Agentome asks Leave without saving?. Click Keep editing to stay, or Leave without saving to drop them. The browser also asks before you close or reload the tab.
Instructions
The instructions are the agent's job description: what it does, how it works, and when a task is
done. Write them in Markdown. They go into the agent's CLAUDE.md as they are, under an
Instructions heading.
Edit them on the Write tab and read them formatted on Preview. An agent with instructions opens on Preview, an empty one on Write.
Good instructions say what the agent owns and what it does not, the steps of a typical task, what it checks before it says it is done, and what it must never do. The role templates are a good model to start from.
Skills
A skill is a SKILL.md file that tells an agent how to do one kind of work, such as writing release
notes or reviewing a migration. Skills live in the Library, and an agent reads one when a task
calls for it.
To give the agent a skill, click Add a skill in the Skills section, search for the skill and pick it; the list shows each skill with its version. To take a skill away, click the cross on its chip.
Shared and private skills
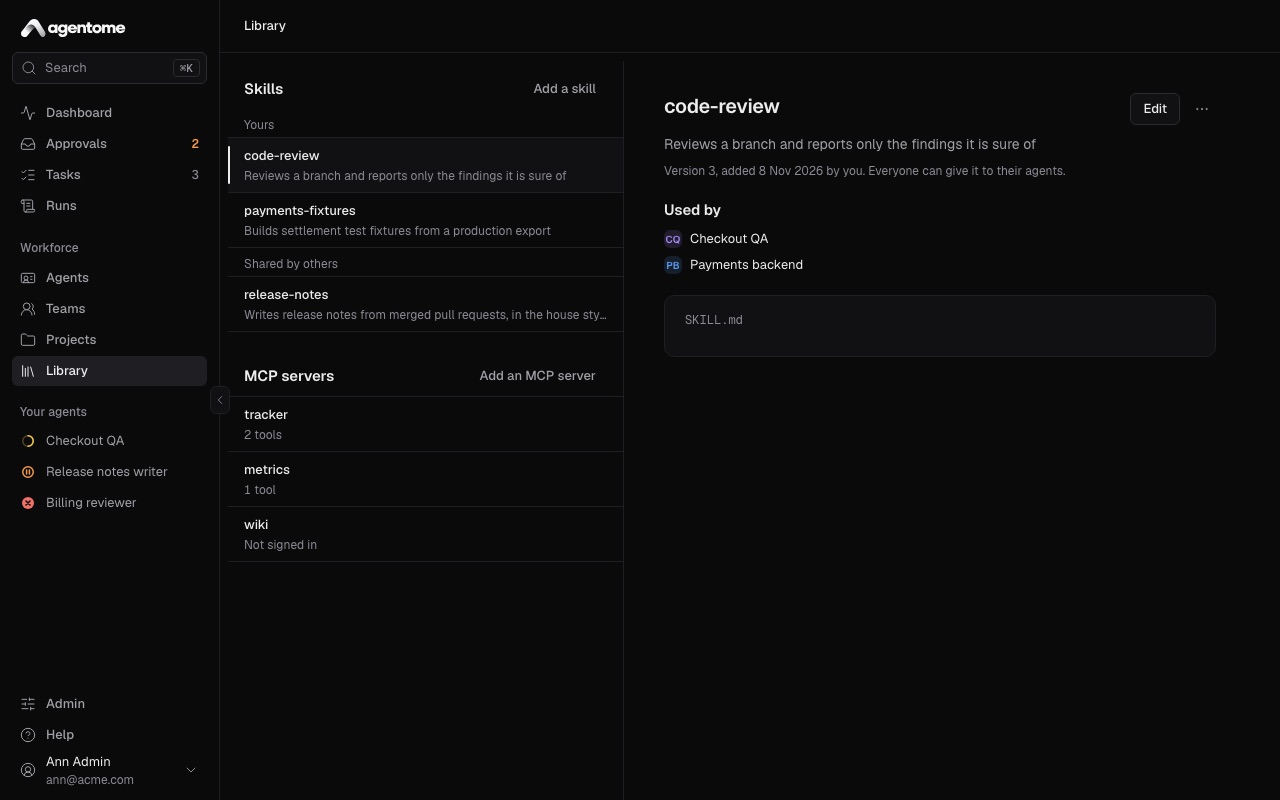
In Library, skills come in three groups: Yours, Shared by others and From Agentome. A skill you add is private: only you can give it to your agents until an admin opens it and chooses Share with everyone. A private skill shows private on its chip in the editor, and the sheet counts private skills under Knows.
To add a skill to the library, open Library, click Add a skill, paste the SKILL.md, and
click Add skill. Its frontmatter names the skill and says what it is for.
Versions
Each skill has versions. To change one of your skills, open it in Library, click Edit, and click Save as a new version. Keep the name to save a new version; a new name makes a new skill.
An agent keeps the version it was given; only a skill From Agentome is updated in place when Agentome is. When the library has a newer version, the editor shows Move to version with its number next to the skill's chip. Click it when you are ready for the agent to use the new text. The skill's page in the library lists which of your agents have it, under Used by.
Team
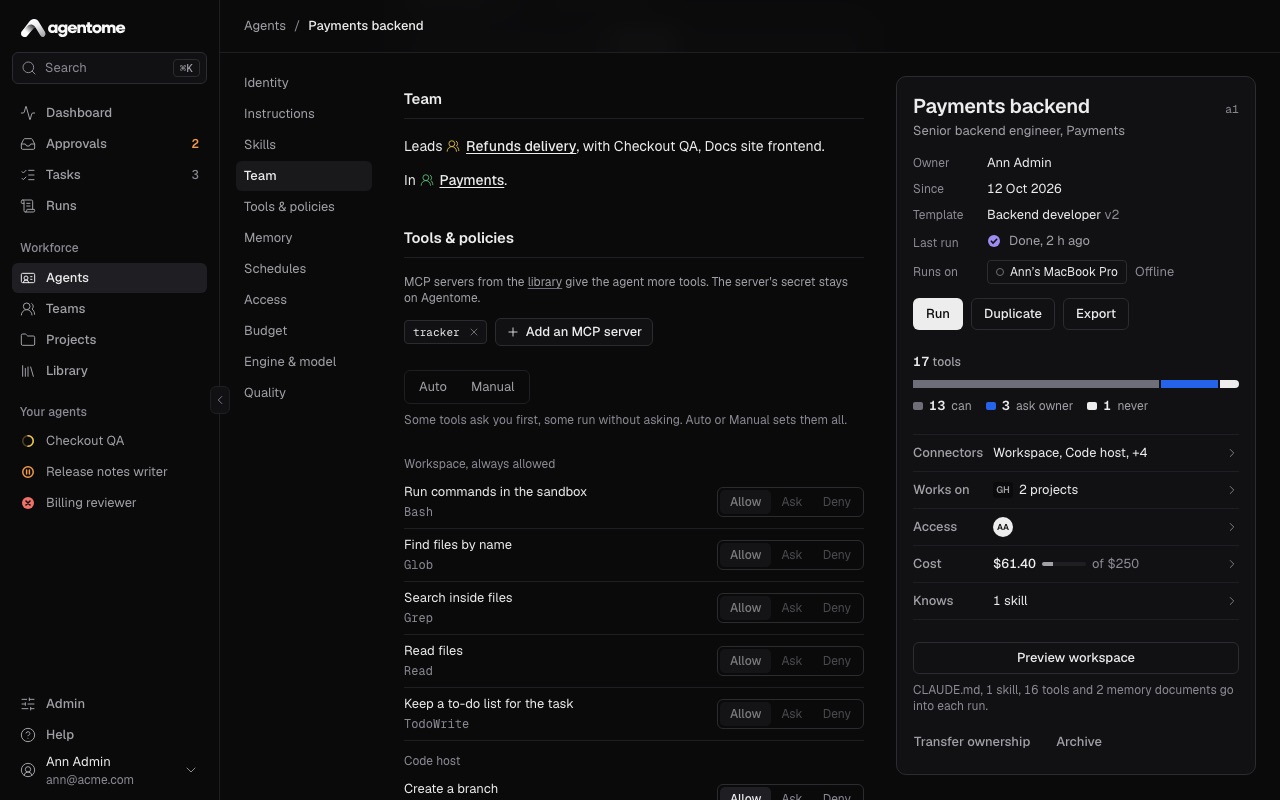
The Team section says which team the agent leads and which teams it is a member of, each as a link to the team's page. If the agent leads no team, you can click Create a team it leads. You add members on the team's page. An agent on the Codex engine cannot lead a team. Teams, nested teams and how a lead splits a task are in Teams.
Tools and policies
The Tools & policies section decides what the agent can reach and what it may do without asking.
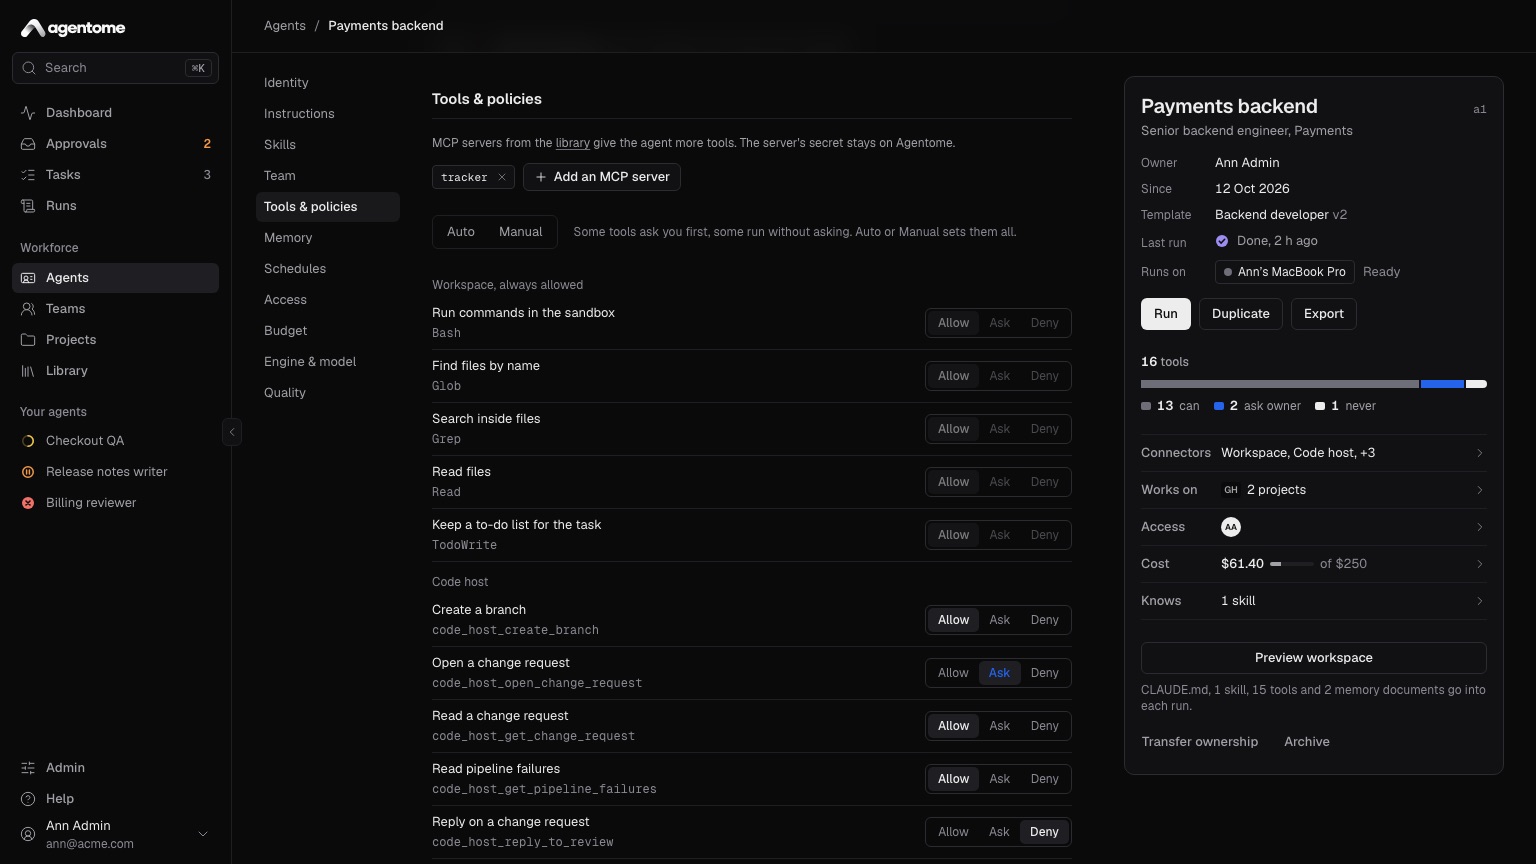
MCP servers from the library
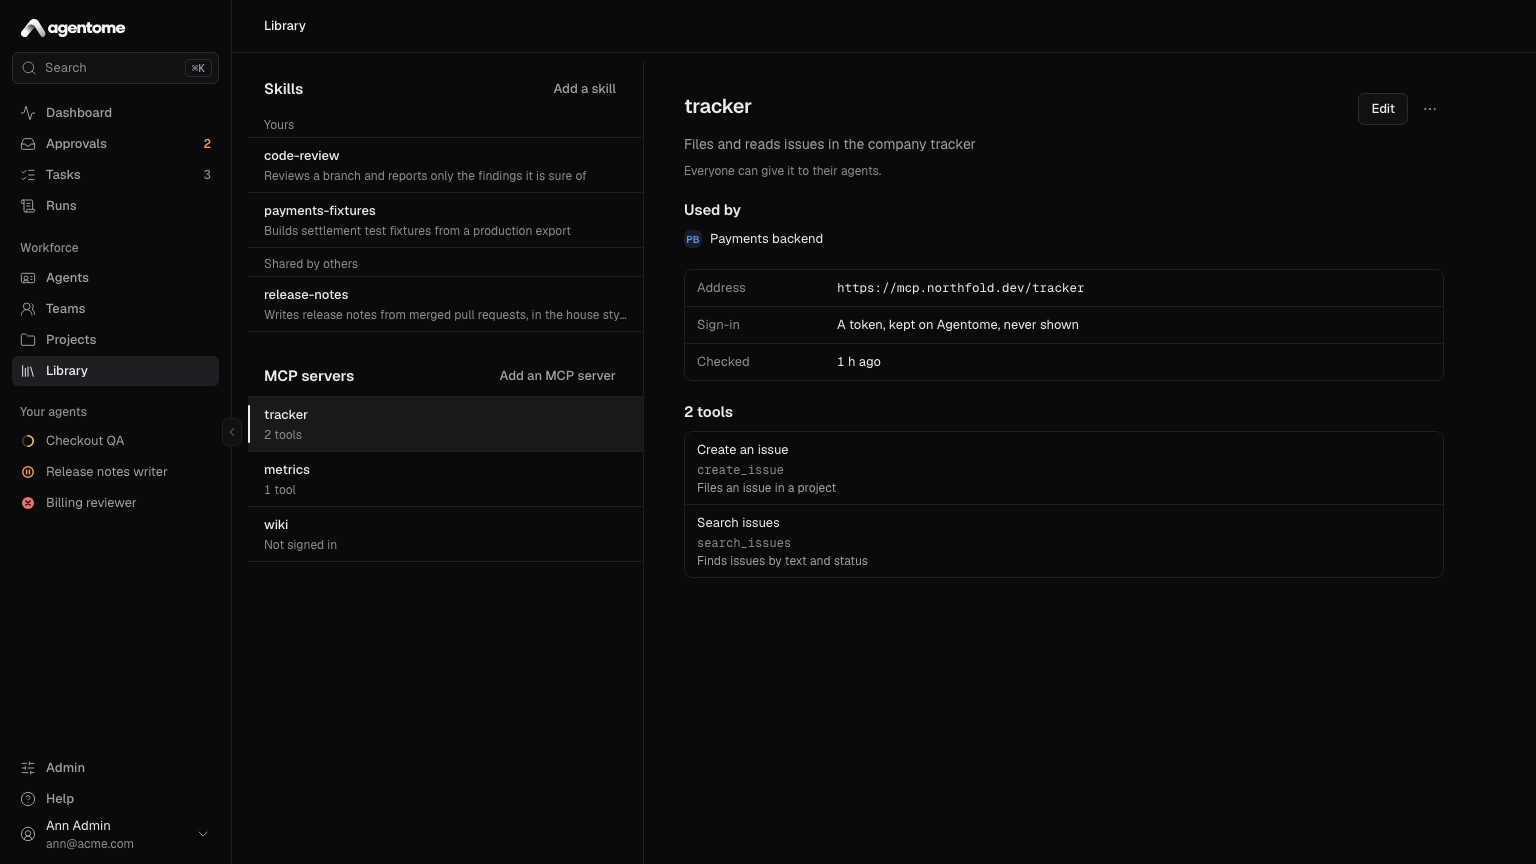
At the top of the section, click Add an MCP server and pick one of the servers in your library. Its tools join the list below under the server's name. To take a server away, click the cross on its chip. The server's secret stays on Agentome and never reaches the computer that runs the agent. You add servers to the library in Library with Add an MCP server; see Integrations.
Policies
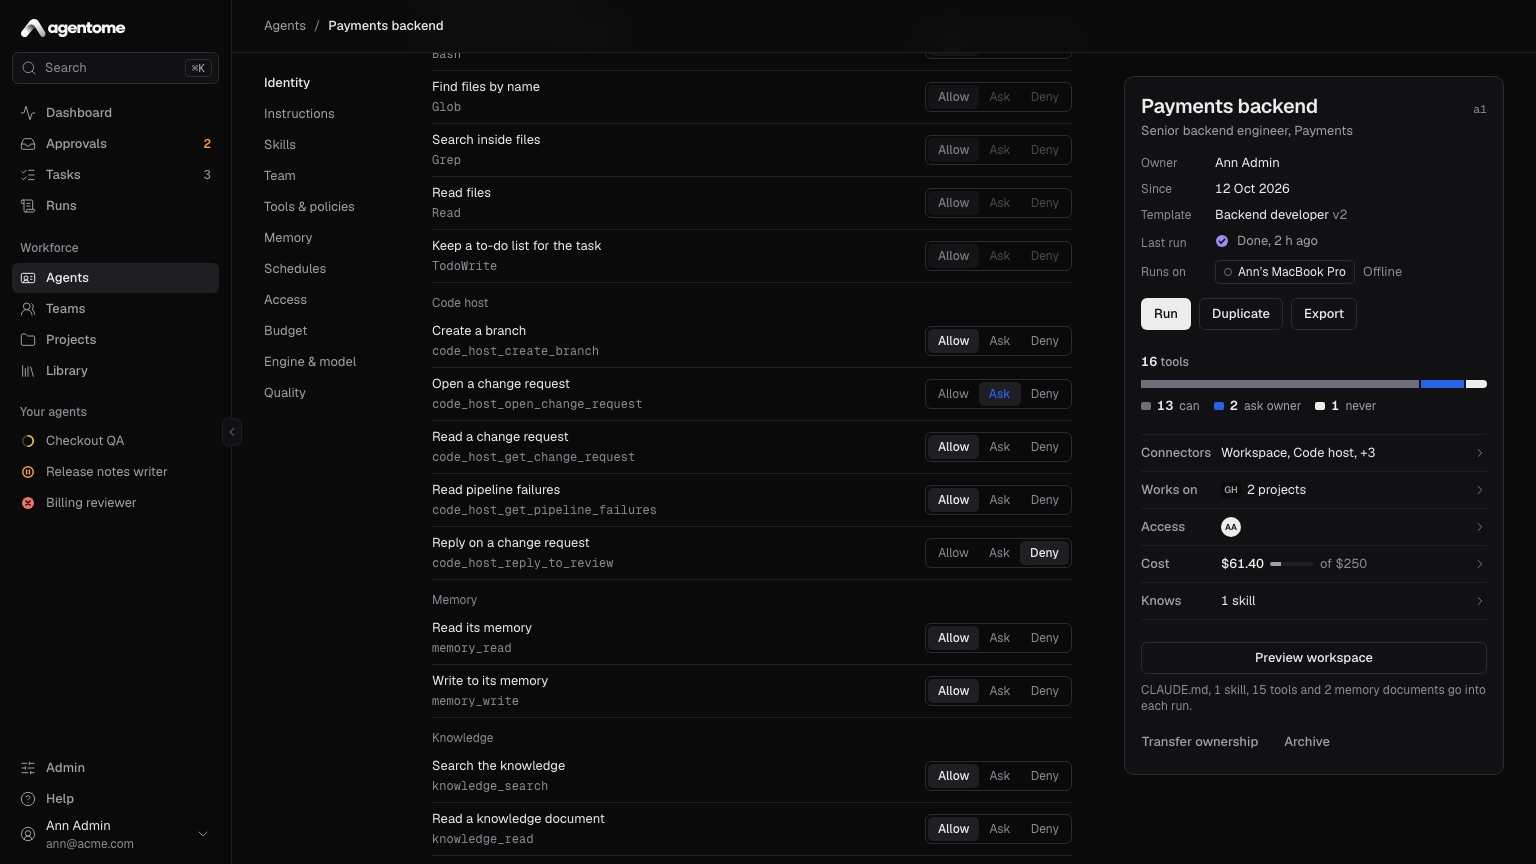
Each tool has one of three policies. Click one next to the tool to change it; it saves at once and applies to the next call.
- Allow: the agent uses the tool without asking.
- Ask: the call waits for the owner. The sheet calls this Ask owner.
- Deny: the call is refused, and the agent is told so.
The tools come in groups: the code host (create a branch, open a change request, read a change request and its pipeline failures, reply on it), the agent's task, its memory, the projects' knowledge, Jira, and each MCP server. The Workspace group is always allowed: those are the engine's own tools, such as reading and editing files in the run's workspace, which it uses with nobody to ask.
Until you change them, opening a change request and commenting on a Jira issue ask first, every tool of an MCP server asks first, a team lead's Start a team step asks first, and the rest are allowed.
The Auto and Manual switch above the list sets every tool at once: Auto allows them all, Manual makes them all ask. A tool you denied stays denied either way.
What Ask does
When the agent calls a tool set to Ask, the call stops and waits in Approvals. The run shows as waiting for approval. The owner sees what the agent wants to do and the run so far, and clicks Approve or Deny; the run goes on with that answer. The time a run waits for a person does not count against its time limit.
Approvals on the web and on a phone are in Approvals and control.
Memory
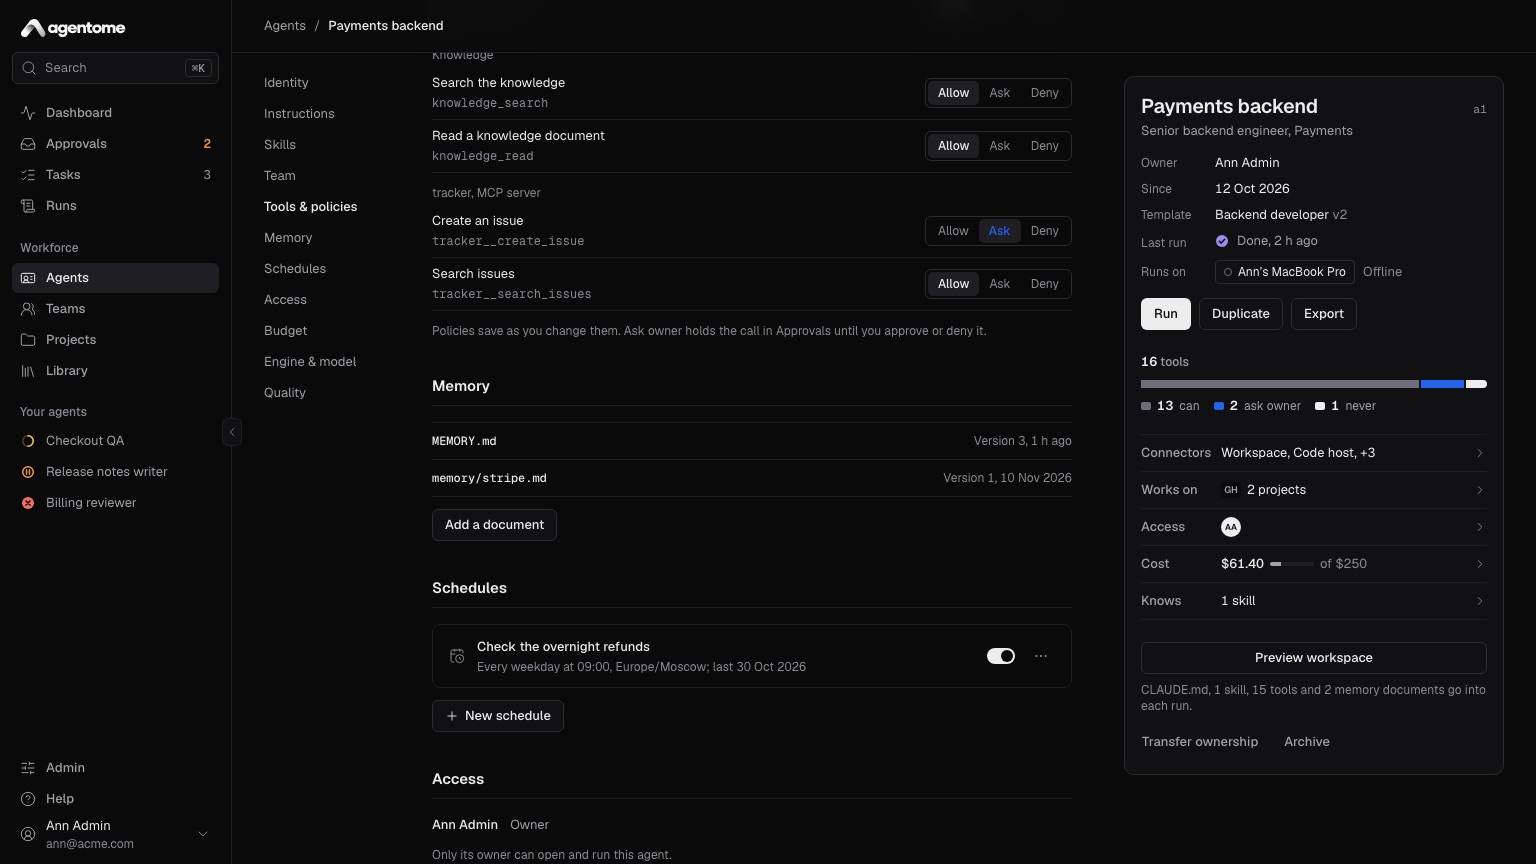
An agent's memory is a set of Markdown documents that carry what it learned from one run to the
next. There is MEMORY.md, and any number of documents in memory/, such as memory/stripe.md.
Each run gets them beside its CLAUDE.md, as they were when the run started, and the agent saves a
document again with its memory tool when it learns something worth keeping. The Memory section
lists the documents with their current version and when they changed.
Read and edit a document
- Click a document. It opens on Document, formatted.
- Click Edit, change the text, and click Save.
Every save makes a new version; the old one stays. If the agent or someone else changed the document after you opened it, Agentome refuses the save and says so. Your text stays in the field so you can copy it; close the document, open it again, and make your change on the new version.
Add a document
- Click Add a document.
- In Path, type
MEMORY.mdor a name inmemory/, such asmemory/release-steps.md. - Write the text and click Save.
The agent reads it in every run, beside its instructions. Use this to give the agent a note it should keep in mind.
Versions and reverting
Open a document and click History. On the left are its versions; click one to see what changed from the version before it, line by line, and who wrote it: by a run, with a link to that run, or by a person's name.
To go back, pick an earlier version and click Revert to version with its number. Reverting saves that text as a new version, so nothing is lost and you can revert the revert.
Schedules
A schedule gives the agent the same task on set days at a set time, as if someone filed it.
Add a schedule
- In the Schedules section, click New schedule.
- Pick the Project its tasks are filed in. Every task belongs to a project, so the agent must be on at least one; if it is on none, the dialog says so and links to Projects.
- In Task, name the task, for example "Write the weekly release notes".
- In What to do, describe the work in Markdown. It goes to the agent as it is.
- Under Days, click the days it runs. Monday to Friday are on to start with.
- Pick a Time, in half hours, and a Time zone. The time zone starts as your browser's.
- Click Add schedule.
The list shows each schedule with when it runs, its time zone and when it last ran. Use the switch on a row to pause or resume it. To delete one, open its Actions menu and click Remove.
A scheduled task runs where the agent works (see Engine and model). On the owner's computer, the run waits until the owner is at the computer; on the server, it starts at once. If the agent has reached its monthly limit, the task is still made and waits for its owner. A minute missed while the Agentome server was down is skipped, not caught up.
Access, transfer and archive
Access
The Access section lists who holds the agent: its owner, and, while it is lent, who has it until which day. Only its owner can open and run an agent. To let someone else work with an agent, transfer it to them.
Transfer ownership
Transfer an agent when its owner goes on holiday, changes role or leaves. The agent's memory, history and settings go with it.
- Save any unsaved changes first; Transfer ownership stays unavailable until you do.
- On the agent sheet, click Transfer ownership.
- In New owner, choose a person.
- In Comes back, leave Never: it is theirs for good, or pick the day it returns to you.
- Click Transfer.
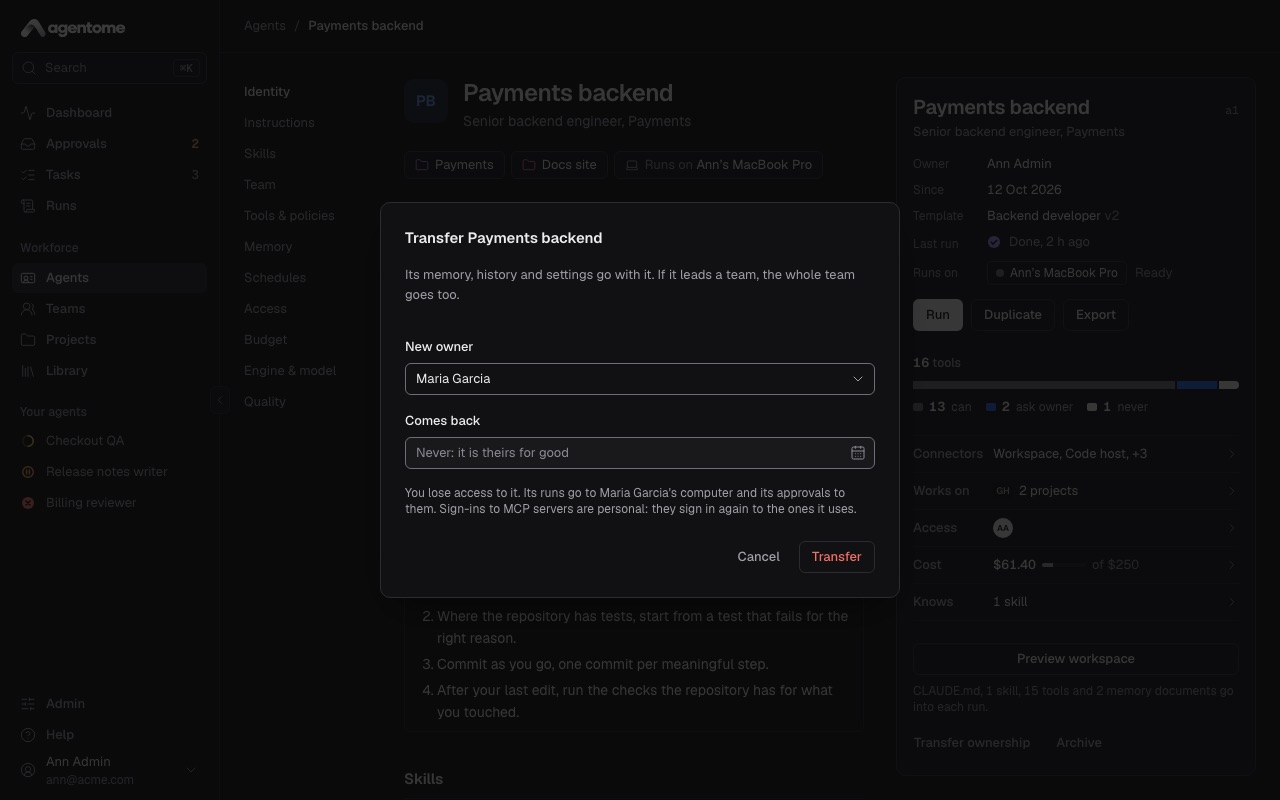
From then on, its runs go to the new owner's computer and its approvals to them, and you no longer see it. With a return day, the agent comes back to you by itself on that day. Until then, the person who has it can only send it back early: Transfer ownership on their sheet offers Return now.
Keep in mind:
- An agent that leads a team goes with its whole team. A member cannot be transferred alone: transfer the lead.
- An agent cannot be transferred while it is running: wait for the run to end, or cancel it.
- Sign-ins to MCP servers are personal: the new owner signs in again to the ones the agent uses.
When a person leaves, an admin can hand every agent they own to someone else at once with Transfer agents in Admin → People; see Administration.
Archive
Click Archive on the agent sheet and confirm. The agent takes no more runs, its queued runs are cancelled, and it leaves the sidebar and the Active list. Its history stays. To bring it back, open it from the Archived tab and click Unarchive on its sheet.
Budget
The Budget section limits what one run, and a month of runs, may use. Save after editing.
Per-run limits
Minutes per run, Turns per run and Tokens per run: a run stops at the first limit it reaches. An empty field uses the platform default shown in it.
Monthly limit
Needs a license key.
Monthly limit, USD: when the agent's spend this month reaches it, no new run starts. Its owners hear of it at 80%. Leave it empty for no limit.
When a monthly limit is set, the section shows this month's spend against it. When the limit is reached, new runs are refused and a Continue this month button lets the agent go on until the month ends. To give it more room for good, raise the limit.
Project budgets and run limits across agents are in Approvals and control.
Engine and model
The Engine & model section decides what runs the agent, where, and on which model. Save after editing.
Engine
- Claude Code: Anthropic's Claude Code. On the owner's computer it runs under the owner's Claude subscription; on the server, on a Claude model of a model connection.
- Codex: OpenAI's Codex. On the owner's computer it runs under the owner's ChatGPT sign-in; on the server, on a GPT or company model of a model connection. A Codex agent leads no team.
Changing the engine clears the model, since each engine has models of its own.
Where it works
- With its owner: the agent runs under its owner's own subscription, while they are at work: in their place on the company's server, or on a computer they connected. No API key is needed. How to make a place or connect a computer is in Where agents run.
- By itself: the agent works by itself on the company's server, with a model connection's key. Nobody needs to be at work, and actions still wait for a person where the tool policies say so.
On the server
Needs a license key.
By itself also needs a model connection. Until both are there, the option is unavailable, and the line under it says what is missing. An admin adds model connections in Admin → Models; see Administration.
Model
On the owner's computer, Model offers Default, which lets the engine choose, and the engine's models, such as Claude Opus 5.5 or Claude Sonnet 5.5 for Claude Code, and GPT-5 Codex or GPT-5 for Codex.
On the server, first pick a Model connection, then a Model from that connection. Claude Code runs Claude models only; Codex runs the rest.
An admin also sees Allow a shell on the server for a server agent. With a shell the agent could read the connection's key, so turn it on only for an agent that has to run commands, such as tests.
Quality
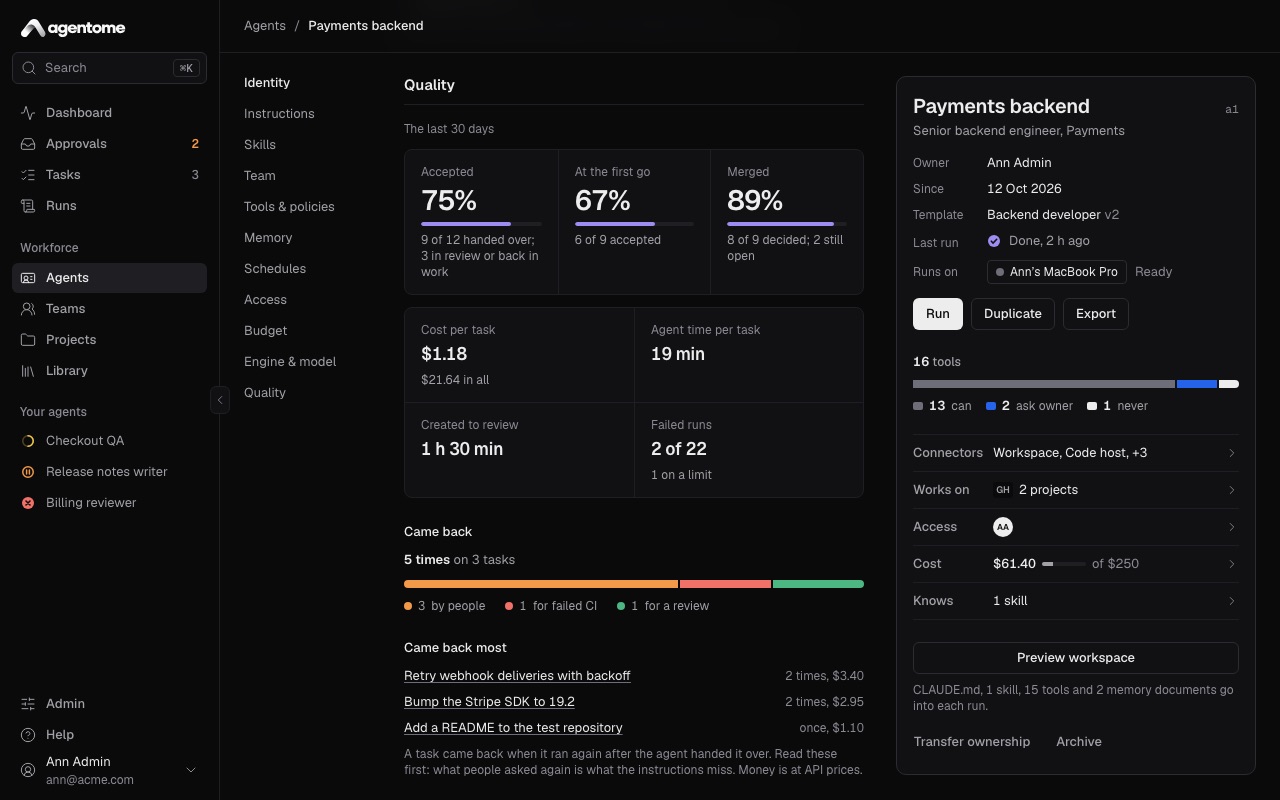
The Quality section shows how the agent's work landed over the last 30 days.
Needs a license key.
- Accepted: the share of tasks the agent handed over that people accepted.
- At the first go: of the accepted tasks, the share that never came back for more work.
- Merged: of its change requests that were decided, the share that was merged. Shown only for an agent that opens change requests.
- Cost per task (at API prices), Agent time per task, Created to review and Failed runs.
- Came back: how many times work returned after the agent handed it over, split by why: by people, for failed CI, or for a review.
- Came back most: the tasks that returned most often, with links. Read these first: what people had to ask for again is what the instructions miss.